 Every voice-over artist needs to know how to select, set up, and maintain their home studio. I’m going to start a little out of order and begin with Setting Up your home studio, because that’s the easy part. Then I’ll cover the Maintaining part, because that’s also easy. Selecting where to put your studio, well… that’s going to take awhile, so I’ll save that for last.
Setting Up Your Home Studio:
“Brothers and Sisters can I hear an amen for the amazing advancements in technology?” It’s because of this technology, having a professional quality home studio is possible. It’s inexpensive and easy to do. Here’s all you need:
- A relatively new computer, a laptop will work perfectly.
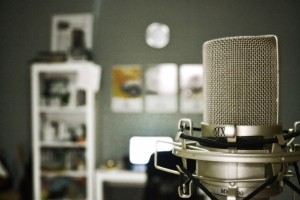
- A quality large diaphragm condenser microphone.
- A microphone stand.
- A pop filter.
- A good set of professional headphones.
- A professional quality computer interface.
- Audio recording software. We recommend AUDACITY (it’s free!!)
Your computer can be a Macintosh or a PC, either one works well as long as they are using the current operating system. As for the rest of the equipment, you can find it in music stores or online. There are a multitude of different brands of microphones and computer interfaces out there (too many to list here), and you can certainly search for them on Google, but I highly recommend you check out the full studio packages offered by Such A Voice. You can’t beat the price for the quality you’ll receive. Click here to check out our home studio equipment package.
Okay, so now you have all your studio equipment… how do you set it up? Again that’s easy, simply go to www.suchavoice.com/support and you’ll find some great articles and videos on how to set up your equipment and how to use the Audacity software. Also, if you’re a Such A Voice student most of you will get two free half hour sessions with me, Ben Marney to help you sort through the simple setup process and I’ll also show you how to use the Audacity software.
If you are a current Such A Voice student, email raymond@suchavoice.com to see if your package includes free sessions.
You can also purchase sessions by clicking here.
Maintaining Your Studio Space:
I’m not talking about battling with your significant other about “maintaining” the space you’ve claimed as your studio in your house, because they hate all the messy wires and equipment-strewn all over the dining room table or back bedroom. No, that’s not what I’m talking about, but this can become a real problem that pertains to the last subject of Selecting a proper space for your studio and we’ll get to that in a minute. I’m talking about two different ways of “maintaining” your studio.
First, keeping your equipment clean and dust free. Believe it or not this is real a problem. I’ve found a soft bristle paintbrush is the most effective tool to keep the dust from getting into my microphone and computer interface. Simple house dust can do considerable damage to electronic equipment. And of course, keeping it a smoke free environment is an absolute. Try the paintbrush, but don’t get one out of your garage, go to Home Depot and spring for a new one.
The second part of Maintaining your studio I’m talking about, is staying current with your updates. Do not procrastinate, always update to the latest version of your recording software you’re using, the latest driver for your computer interface and the latest operating system for your computer. If you don’t do this, you’ll miss out on repaired software glitches and security updates.
Now for the most difficult part:
Selecting The Best Space For Your Home Studio:
My background is in the music business. For over four decades I’ve made my full time living as a professional singer/musician. So when I was searching for and eventually bought my current house 10 years ago, one of my main concerns was having an area that I could use as a studio. Having the ability to record my original music, store all my musical gear and have an area big enough to rehearse with my band was critical to me. So I guess you could call me one of the lucky ones, my wife allowed me (yes, she does wear the pants in the family) to use that area for my studio space. As long as I allowed her to decorate the other guest bedrooms with custom made drapes, a custom-made bedspread and cover the bed with way too many throw pillows (what’s the deal with women and throw pillows… sorry I digress, I’ll save that for another blog) She allowed me to do whatever I needed to do to turn that area into a studio.
When I decided to get into the voice-over business and graduated from the Such A Voice Master class in Vermont, I immediately went home and built a vocal sound booth in my music studio. So the decision of selecting the space for my voice-over home studio was an easy one from me to make. Like I said, I’m one of the lucky ones. That was almost 9 years ago.
Throughout my years in the voice-over industry, at voice-over conventions and at other functions, I’ve had the pleasure of meeting and hanging out with some very successful voice-over talents. Over a drink or dinner, inevitability the subject of our home studios would come up and what I discovered from talking to these very successful and prolific voice-over talents has been surprising: about 50% of them, like me had either taken over a guest bedroom or a home office, and converted it to their permanently set up studio. However, a very surprising number of them didn’t have a permanent studio setup at all. For my New York City friends, where living space is at a premium, most did their work in their clothes closets and had to set up and take down the their studio equipment for every session. Some were lucky and had walk-in closets, but some actually worked out of small coat closets. My point is… selecting the proper space for your home studio will require some serious thought and a little creativity.
Here’s what you’re looking for:
- Walk in closet
- Coat closet
- Laundry room
- Home office
- Back bedroom
Look for the quietest area in your home. Any place you have that you can surround your microphone with sound absorbing material, because that’s your goal. Surround the microphone (not necessarily around your computer) with material that will absorb the sound and not let it bounce around the room. Remember, you’re not trying to set up a Professional Music Recording Studio you are setting up a Home “Voice-Over” Studio. There is a big difference.
Commercial Professional Music Recording Studios are much more demanding and require very well thought out acoustic treatments. They have to control the sound in the main studio area, the drum booth, the vocal booth and the control room (mixing area.) Most of these studios have been designed and built per the specs of an acoustic engineer and recording studio architect. They are very expensive and very complex. This is the image most people think of when the word “Home Studio” is mentioned, but in reality they are very different.
In a Home Studio, only the immediate area around the microphone needs to be considered. Due to the fact that in voice-over recording the artist works only inches away from the microphone, it is very simple and inexpensive to control the acoustics or ambient noise surrounding the microphone area. And because most beginning students will be mixing their voice-over recording using professional headphones, the mixing area or room ambient noise (where your computer is located) will not come into effect or need to be considered.
How to create a “Sound Bounce Proof” area is actually very simple. Remember the goal is to stop the sound from your voice from bouncing off the walls behind and around your microphone.
- Walk around your home and find the quietest area. Don’t forget to look in your closets. If there is room for a microphone stand and your head, it will work. Remember, only the area around the microphone is what is important.
- Make sure the area around the microphone is surrounded by sound absorbing material.
- Hit record on your computer, walk to the microphone, put on your headphones and do the read. When you’re done, walk back to your computer and hit stop. It’s just that simple.
You may have to be a little creative to find the best place to set up your studio and you may have to purchase a longer microphone cord and an extension for your headphone to accomplish what you need, but once you get it all set up you’ll be ready to launch your voice-over career, recording professional quality work.
Find this useful? Dig even deeper into topics like this in our VIP Membership program.
Ben Marney has been a studio engineer, singer and musician for over 40 years. Over the last 8 years (as a full time voice-over talent) he has recorded literally thousands of radio and television commercials and has been the narrator for three national television shows airing on the Discovery, Destination America and Sportsman channels. He currently resides in Port St. John, Florida where he (with his wife’s permission) produces voice-overs out of his home studio.