Having a high quality home studio has always been important as a voice actor. But these days, home studios are no longer just for auditioning or for certain types of work. Home studios are absolutely essential if you want to work in voice-over. With all professional studios closed for the foreseeable future (at least here in NYC!) more and more casting directors are requesting actors with “broadcast quality” home studios. This means clients with commercial, narration, and animation work are booking talent who can not only deliver a killer performance, but also have a killer studio sound – which in turn means that when you audition these days, it’s not just your acting chops being evaluated, it’s also the quality of your sound. And that means having a high quality home studio.
Realistically, the expectation that voice actors have quality studios will remain even after everything reopens. Now, if you have the money to purchase a pre-fabricated booth, you will be saving yourself a lot of time, but the price tag can be prohibitive. Building a “broadcast quality” home studio yourself can seem overwhelming. But, as with everything in your voice-over journey, if you take it step by step, you can accomplish your goals.
One of the first questions people ask about home studios is “what microphone should I get?” And while that is a good (and fun and exciting!) question, it’s also not the first question one should be asking when they are starting to set up their recording booth. Did you know that the space that you record in is even more important than the equipment that you use? (Well, within reason, of course.) Think about it this way, if you want to shoot headshots and have an amazing camera, would you shoot those headshots in the industrial lighting of a supermarket? Nope! That amazing camera will pick up all of the harsh lighting, unforgiving shadows, every odd reflection, and every blemish on your face! Instead, you would want to shoot those headshots in lovely, warm, diffused lighting. That is what you want to do with your sound too!

To accomplish this, we will explore a few topics in two blog posts: location, sound isolation, sound absorption, and lowering your noise floor.
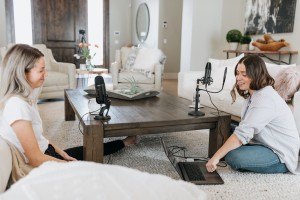
The first question you have to ask yourself when building your home studio is, “Where am I gonna put this thing?” Let’s factor in three variables: ease of daily setup, your home environment, and using what you already have.
In terms of daily setup, you must ask yourself, “What is the maximum daily setup time I can handle before I start procrastinating my work,” and do fewer steps than that. For example, if you have to move storage out of your closet, hang up a sound curtain, set up your mic and computer, and turn off your refrigerator every single time you want to do an audition….you might find yourself doing fewer auditions. Be honest with yourself about what you can handle and find a way to work within that parameter. Then, make it part of your ritual. You can even do some vocal warmups as you set up!
Next, you have to take stock of your home. Where in your home can you dedicate to voice-over, free from distractions and with as little noise as possible? This will be different if you live on a quiet block in the suburbs, or on a busy city street. You may be surprised at what areas of your home are quieter than others. You can download a decibel meter application on your phone to get a general idea of what areas of your home are quietest. While it won’t give you a perfectly accurate read, it will give you a great comparison. Here is an article listing several different apps for iphone and android.
When looking for your ideal quiet and distraction free space, evaluate what resources you already have. Do you have a walk-in-closet? A storage room? A basement or attic? A wall with a cutout or structural depression? If you do, you might just have the beginnings of a home studio! Now that you have found the ideal place for your home voice-over studio, your focus shifts to sound isolation.
In the simplest of terms, sound isolation is keeping outside noise from coming into your recording. Sounds like roommates, street noise, air conditioners, barking dogs, and the sound of your neighbor’s television that is blasting so loud you can hear it all the way in your booth – not that I have any experience with that actual problem myself- are all extraneous noises that you want to keep out of your recording. Because sound travels through air, the most obvious way to make something sound proof is to make it air-tight. Now, creating an air-tight space is very difficult, so just get as close to air-tight as you can. If your booth is a closet or storage room, close the door. If you don’t have a door to close you may have to build yourself a booth or even a fort. Closing yourself off like this does create an issue with air flow, however. You will get hot. I find that about 90 minutes in the studio at a time is my max, then I have to leave the booth, turn on the air conditioner, and take a break. If you’ve ever worked out of a professional studio you may wonder how the pro studios create a soundproof space without turning it into a sweat box. The answer is: double or triple walled structures with sound absorption material between the walls. Then using a ventilation system to force air through the walls, while running that air through the sound absorption materials, so it reduces the sound waves, but allows the air to pass through. Sounds a bit complicated, so you may just have to let it get hot, then take a break every 90 minutes or so.
In addition to making your booth air-tight you can also reduce the decibel level of outside noise coming into your recording by putting mass between you and the intrusive noise. If there is noise coming through a particular wall you can move something in front of it, say a bookshelf or other piece of furniture. If you have a window where sound comes in, you can put up a sound blocking curtain or make a “window plug” out of plywood and foam insulation tape.
Once you’ve put mass between you and the extraneous noise and closed the literal or metaphorical door on it, you’ll want to test your noise floor (more on that in the next blog post.) If you need to further reduce the extraneous sound you can “seal up the leaks.” An easy way to do this is to turn off the lights in your recording space while keeping the light on in the surrounding area. Where light is leaking in, most likely sound is leaking in. You can seal up those leaks with draft protectors, foam insulation tape, or expanding foam. It is important to note however, that acoustical foam which you characteristically see covering the walls and ceilings of voice-over booths, is not a soundproofing material. However, it is very useful and we will discuss that in the next blog post!


