
Low-frequency hums and high-frequency hisses can ruin an otherwise perfect take. A clean and quiet background is essential for voice-over tracks, and clients will expect pristine audio. This guide seeks to improve the quality of your recordings with the following methods:
- Identification: Finding the sources of noise.
- Prevention: Steps to eliminate interference at the source.
- Remediation: A few post-production techniques for noise removal.
1. Identifying Hums and Hisses
In order to fix an audio issue, you need to be able to identify it properly. Terms like hum, hiss, crackle, and static are often used interchangeably, but they originate from entirely different sources.
Attack of the Drones
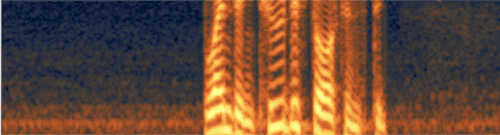
A hum is a low-pitched, continuous droning sound. If you observe the spectrogram in your recording software, a hum usually lives at the very bottom of the spectrum, specifically around 60Hz. It often features harmonics echoing at 120Hz, 180Hz, etc.

Hums are almost always electrical in nature, though they can occasionally originate from external equipment. The most common causes include:
- Ground Loops: Equipment plugged into multiple power sources with varied ground potentials.
- Electromagnetic Interference: Created when power cables are run near signal lines.
- Unshielded Power Supplies: Using poorly insulated power devices.
- Nearby Appliances: Interference from heavy household appliances operating near your recording space. HVAC, air conditioning window units, and refrigerators are common causes.
Revenge of the Hiss
A hiss sounds exactly like it reads. A constant “shhhh” sound similar to a rushing waterfall. It lives in the upper middle to high frequencies, usually resting above 4kHz.
Every piece of equipment, from your microphone to your audio interface, generates a small amount of internal noise. If you are forced to increase the gain on your interface to an extremely high level just to get a decent signal from your microphone, you are amplifying that internal hiss along with your voice.
2. Prevention at the Source
As any professional audio engineer will tell you, modern post-production tools are wonderful, but over-reliance on them to fix preventable problems will degrade the natural quality of your voice. Here are some suggestions to ensure your audio quality is impeccable before you hit record.
Gain Staging Settings
Gain staging is the process of setting your recording levels appropriately to maximize your Signal-to-Noise Ratio (SNR). Adjust your input settings so that your normal speaking voice peaks somewhere between -12dB to -6dB on your input meter. When your recording is too quiet initially, significant amplification in post will also increase your noise floor. If your dynamic mic requires massive amounts of gain, invest in an inline preamp to provide clean volume without introducing hiss.
Manage Your Cables
Unshielded, inexpensive, or frayed cables act like antennas for interference. Use high quality, balanced XLR cables for your microphones. Balanced cables are specifically designed to prevent electrical interference picked up along the cable run. Additionally, keep your audio cables physically separated from your power cables. If they absolutely must cross, ensure they cross at a 90-degree angle rather than running parallel to each other.
Power Conditioning
Tidying up your power supply can drastically improve your noise floor. When possible, plug all your audio equipment, your computer, and your studio monitors into a single, high quality power conditioner or surge protector. Avoid plugging your recording gear into the same circuit as heavy appliances, dimmer switches, or fluorescent lights.
Assess Your Environment
Occasionally, the hum or hiss isn’t electronic. Modern microphones are extremely sensitive and exterior noise may be bleeding into your booth. Turn off the HVAC system, or nearby appliances while recording. Whine from your computer fans may also need to be isolated. A physically quiet room is the first step in a quality recording.
3. Remediation in Post-Production
Even in a best case scenario, your noise floor levels may need an adjustment in post. Be sure to lightly apply any effects, as heavy-handed processing can ruin the tone and timbre of your voice.
Equalizers and Filters
A high-pass filter (or low-cut filter) is your first line of defense against low-frequency noise. Generally, you can safely roll off the very bottom of your audio spectrum to clear out room rumble. Apply an EQ plugin to your track and engage a high-pass filter. Set the cutoff frequency somewhere around 100Hz, and use a gentle slope like 12dB or 24dB per octave. This will help clear out the muddy frequencies from HVAC units or outdoor traffic, without thinning out the natural weight of your speaking voice.
Noise Gates
A noise gate acts as an automatic mute for your recording, cutting off the audio signal whenever you stop speaking. This can be an effective tool for lowering ambient room noise during the quiet spaces between your lines when applied correctly.
Warning: If your gate is set too aggressively, it will prematurely chop off the natural trailing ends of your words, making your performance sound jarring, abrupt, and robotic. To avoid this, set a fast attack time so the gate opens instantly when you speak, but pair it with a gentle, slower release time so the gate closes smoothly and allows your voice to fade out naturally.
Spectral Denoise Plugins
For stubborn, continuous broadband noise like heavy preamp static or room hiss, dedicated noise reduction plugins like iZotope RX or Waves X-Noise are the industry standard. These sophisticated tools work by “learning” the unique audio profile of your background noise during a moment of silence and digitally subtracting it from the rest of your recording.
Warning: If you push a spectral denoiser too hard, the effect begins to degrade the essential frequencies of your actual voice. The result is bizarre and metallic sounding. In post-production, less is always more. It is far better to reduce a hiss by 60% and leave the audio sounding natural than to eliminate the noise 100% and risk an artificial tone.
Final Thoughts
Eliminating the phantom menaces of hums and hisses doesn’t require a degree in electrical engineering, but it does require mindfulness and close attention to detail. By understanding the core differences between low-frequency hums and high-frequency hisses, optimizing your physical recording environment, and applying a deliberately light touch in post-production, you can guarantee that your voice always remains front and center. Keep rockin’ the mic!
P.S. If you haven’t yet taken our introductory voice-over class, where we go over everything one needs to know about getting started in the voice-over industry, sign up here!
P.P.S If you want to learn more from VO experts and grow the knowledge you already have, join our VO Pro group!


